
How to Install iTunes on a Computer?
To correctly install iTunes on your computer in 2025, you first need to download the version of the program that interests you. On our website, there are two versions available: the latest and the previous one. Why is that? Because very often, when a new version is released, the developer spends another six months fixing bugs in the program. During this time, having the latest version, which guarantees stable operation, is very important.
Below is a detailed step-by-step instruction on how to install iTunes on a computer:
- Check the system requirements listed on the Apple website in the iTunes distribution section before starting the iTunes installation. Before you begin installing iTunes, make sure that your computer meets the minimum system requirements. To install iTunes on Windows, you need Windows 7 or a newer version 8/10/11, 400 MB of free hard disk space, and a stable Internet connection. To install iTunes on Mac, macOS 10.14.6 or a newer version, 400 MB of free hard disk space, and a stable Internet connection are required.
- So, you can download iTunes for free in the version you need by clicking on one of the banners with direct download links. Or you can go to the official Apple website and click the "Download" button in the top right corner of the screen. Then you will need to select the version of iTunes you want to download (Windows or Mac) and click the "Download" button. Wait for the download to complete. The choice is yours, download via direct link or go to the official iTunes website:
DOWNLOAD iTunes 12
DOWNLOAD iTunes 11
DOWNLOAD iTunes 10.7
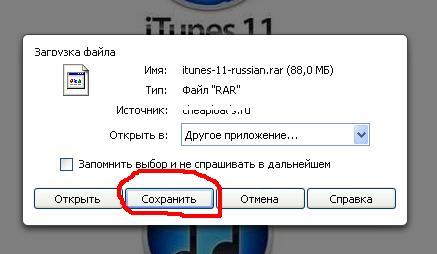
- In the pop-up window, click the save button (highlighted in red):
- In the new window, choose a location for saving, click save again, and download the program to your computer:
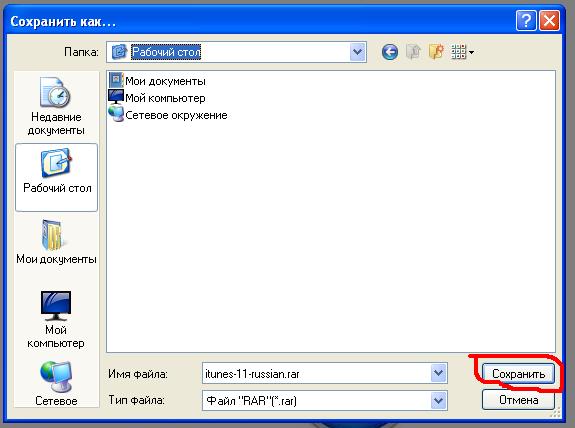
Please note that in some browsers, the download starts automatically without asking about the location for saving. In such a case, look for the downloaded file on your computer (usually in the Downloads folder in My Documents).
- After that, you need to start the installation process. Once the download is complete, locate the downloaded file in the "Downloads" folder on your computer or in the folder where you specified to save the installation file. Since the program distribution is in an archive, you can either double-click to enter the archive and click on the file inside, or run an archiver to extract the file first and then start the installation. For Windows, the file will be named "iTunesSetup.exe," and for Mac, it will be "iTunes.dmg." Double-click to start the installation.
- Please note that your computer's internal security systems may request confirmation to run the file when you start the installation file. If such a dialog box appears, simply click on the corresponding button. The button's label may vary, such as Run, Allow, or Execute.
- Now, the actual iTunes installation begins. When you start the iTunes installation, you will be asked to agree to the terms of the license agreement. Read it, and if you agree, check the appropriate box and click the "Next" button. At the beginning, the program may also request phone number confirmation, which is needed for synchronization processes.
- Please note that before installing, it's advisable to disable automatic updates from the developer to avoid installation issues. You can always re-enable it later:
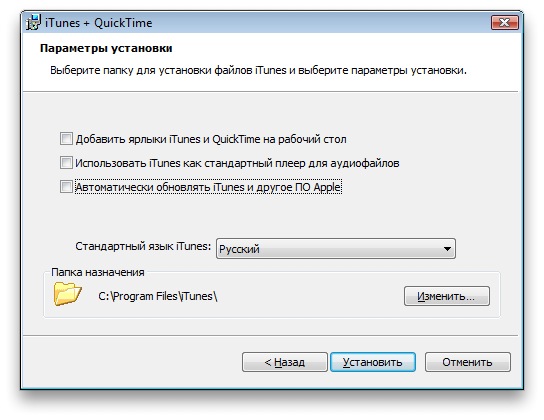
- At this stage, choose the iTunes components you want to install on your computer. It's usually recommended to select all components, but if you have limited disk space, you can deselect some of them. Click the "Next" button to continue.
- In the next window, we recommend checking the options to add WMA, AAC, and MP3 file formats. However, be aware that the program will copy all music files to a separate folder, so it's better to remove the originals from your computer to save disk space:
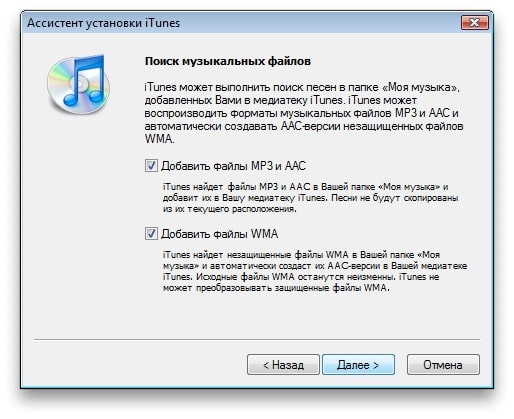
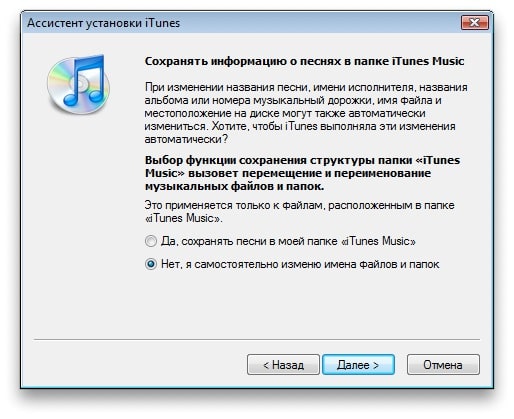
- In the following window, you will be prompted to choose a location for storing your compositions. We recommend selecting "Yes." The program's built-in player will help you organize file storage based on song names, file properties, or artist information:
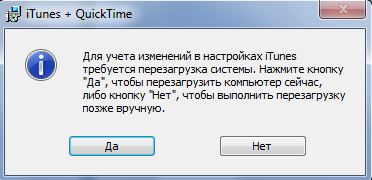
- After completing the iTunes installation, launch the program to ensure it works correctly. If you encounter any problems running the program, you can try restarting your computer and then launching it again. If the problem persists, consider contacting iTunes support. To contact Apple support, visit the official Apple website and go to the "Support" section at https://support.apple.com/en-us. Then select your country or region and product type (in this case, iTunes). On the support page, you will find various contact options for Apple support, including online chat, phone, and email. Choose the most convenient way to get assistance.
- After installing iTunes, you can connect various Apple devices like iPhone, iPad, or iPod to your computer or laptop for music, video, and file synchronization. To connect your device to your PC, use the cable that came with the device. Connect the cable to the device and the computer, then launch iTunes. The device should be automatically detected by iTunes, and you can start file synchronization.
Important note! Remember that besides installing iTunes, you will also need to register for an iStore account and obtain an Apple ID, which you will need for purchasing or downloading apps from the store. To get an Apple ID in 2025, go to the official Apple website and click on the "Create Apple ID" button. Follow the instructions, enter your personal information, including name, email address, and password. After that, you may need to enter a confirmation code sent to the email address you provided or your Apple device. Once the registration is complete, you can use your Apple ID to purchase apps in the App Store, sync data between devices, and more.
If you encounter issues with the program and need to reinstall iTunes or simply want to uninstall it, please refer to the article on how to uninstall iTunes. It provides all the necessary information to successfully remove the program from your computer.
This website is not affiliated with Apple Inc. Mentioned trademarks are the property of their respective owners.


